Hello there!
You may have noticed that I haven't been on for a little while. At first it was because I have been so busy helping our daughter and family with their move. Now its because for some reason I am unable to upload my photos. I am not sure what is going on so I have decided to use my Stampin' Up! blog as I am able to upload photos on there but not to the actual blog (for some reason). You will need to go to Featured Product and under that you click on See More. This will take you to My Cards. First of all you will need to click on this link. I don't have many on there at this stage but hopefully it will build in time. By stopping by at my SU! website you can check out all the specials that are happening and you can find out from the horses mouth as soon as they are available. My SU! website is always updated with the current news from SU! so you will never miss out. When trying to upload to this blog my computer says Internet Explorer has stopped working. If anyone out there has an idea I am open for advice.
Until I get back on here I will see you on my SU! blog.
Thanks for popping by :)
Thursday, August 1, 2013
Monday, June 3, 2013
You Make Me Happy
Here is another sneak peek from the new catalogue.
 This one comes from a new stamp set called Hello, Lovely. It is actually quite a versatile set and comes with 10 stamps.
For this card I have used the following:-
Cardstock - Whisper White, Riding Hood Red, Chocolate Chip
Ink - Crumb Cake, Chocolate Chip, Riding Hood Red
Stamp Set - Hello, Lovely
Accessories - Chocolate Chip Marker, Stamp-a-ma-jig, Twine (coloured with Choc Chip ink)
I was inspired by Darlene Devries who made a gorgeous card using a non Stampin' Up! card. I love the colour combination that Darlene used. Pop over here to check out her card. My card looks totally different to Darlene's but would probably make a good masculine card. Hope you like it.
Thanks for popping by :)
Sunday, June 2, 2013
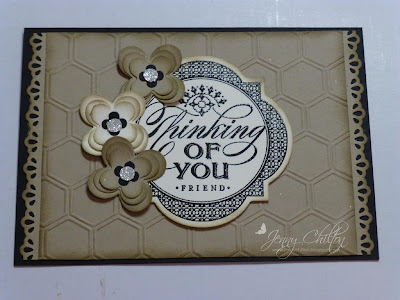
Convention Swaps

I promised that I would come back with some pics of my swap from Convention. This card was inspired by a card that Carolyn King. I recently went to a Stamp Camp run by Pat Carr. Susan Joyce actually did the demo on how to make the card that Carolyn had made. You will need the following:-
Cardstock - Midnight Muse, Crumb Cake, Naturals Ivory
Ink - Midnight Muse, Crumb Cake
Stamp Sets - Papillion Potpourri, Wordplay
Accessories - Dauber, Shimmer Paint (Champagne Mist), Isocol Rubbing Alcohol,
Window Frames Collection 129021, Elegant Butterfly Punch
First of all you need to use your dauber to sponge the Midnight Muse and Crumb Cake inks onto the Naturals Ivory cardstock. Once you have done this you will need to spray the cardstock with water quite liberally. Let the water run over the cardstock so that the colours run a bit. I then used a paper towel to dab to get the excess water off and leave to dry. You can use your Heat Tool to dry off if you haven't used any embossing powder with an image first.
Once it is dry you can then stamp your image onto the cardstock and then I sprayed with Champagne Mist Shimmer Paint mixed with Isocol Rubbing Alcohol. Its amazing how the colour is lifted once you spray this on. The rest is self explanatory.
 |
| All the sentiments ready to adhere to cardstock |
 |
| And they are all ready for Convention |

When I arrived home from Convention I put all of my photos onto USB's for the girls in my team and I made these little tags to write a little note to each of the girls. This is a Sneak Peek in case you haven't already guessed. Its from the new catalogue and the set is called Around The World. I love the colours in the DSP. They are the new In Colours. I won a Prize Patrol which consisted of the Around The World Stamp Set, DSP and a ribbon.

I was kept busy also as I had an order for some Baby Shower Invitations. I only had a week to have them ready by the time I arrived home from convention. I hadn't got much notice before I left for Brisbane. I spent three days and nights making them and I think they turned out pretty good.
I have used the following:-
Cardstock - Pretty In Pink, Whisper White
Ink - Pink Pirouette, Old Olive, Versamark
Stamp Set - Bordering On Romance, Button Buddies
Accessories - White Embossing Powder, Heat Tool, Corner Rounder, Pearls, Delicate Designs Embossing Folder, Framelit Labels collection 125598, Pink Ribbon (unfortunately not SU!)
I will be back with more soon.
Thanks for popping by :)
Stampin' Up! Brisbane Convention
Gosh its been a busy few weeks for me. I have been on holidays for the past two weeks and I can honestly say it feels like two weeks. We had our annual Stampin' Up! convention in Brisbane only this year Stampin' Up! are celebrating 25 years. We had a wonderful time and it was all so inspiring. There are lots of new products in the coming catalogue and we had a sneak peek to some of those and were lucky enough to bring home some of the products. Unfortunately I am unable to show them to you but I can give you a sneak peek.
We arrived in Brisbane on the Tuesday afternoon and settled into our apartment which was only two blocks from the Convention Centre. On the Wednesday myself and three other ladies hired a car and went for a drive to the Tamborine Mountains for the whole day. We had a wonderful time and the rain forest was absolutely gorgeous. We visited the Cheese Factory and strolled through the street to check out all the little shops including the yummy Fudge shop. Mmm! Mmm!
It rained off and on that day and it was 9', the coldest May in 8 years.
We then went to watch the Australian Outback Spectacular which was a very entertaining evening and I found it quite emotional. I felt so proud to be an Australian. The meal was great too. We left there and arrived back at our apartment around 11pm.
The following day was the beginning of the Convention. We saw many WOW demonstrations and I took lots of photos to remember them all. Its hard coming home after this event as we are not allowed to show anyone the products we received and we are so pumped up to show our friends and customers. One of the things that touched my heart was how Stampin' Up! help so many people less fortunate than ourselves. They donate to many charities including Ronald McDonald house. They asked us if we would like to help the Ronald McDonald House in any way and if we did they had someone taking names. I put my name down as a volunteer and am waiting for the call to be able to give back to society. One of the incentive trips that SU! did with their American demonstrators was to visit a poor country town and offer to help by painting and doing odd jobs including entertaining the little children by letting them make cards. This touched my heart so much that I had tears all afternoon and into the evening. I think that was my Pearl for the whole convention. I do hope they put that video onto You Tube or something as I would love to show it to you and lets see if you don't shed a tear.
I came home and spent the next day putting photos onto USB's that various demonstrators had given me. I am chief photographer for the Stamp-a-Roos (Ngaire Andersons group). I love taking photos and it actually lessens the crowd at the show and tell sections. This year there were 700 demonstrators at Convention and it is growing every year. One would think that we would have been crowded with that many demonstrators but it all seemed to flow very well. The Brisbane Convention Centre is very well layed out and there is plenty of room for everyone without rushing in to find a seat. I find sitting anywhere is great as you get to meet new people. We actually met a lovely lady by the name of Cheryl who was attending Convention for the very first time. We all hit it off well and it turns out that this lady is from Brisbane and is moving to Perth later this year. She did not know anyone in Perth but now she has a group of friends so the move wont be so daunting for her.
I will come back later to show you some of the swaps I received and also my swap for Convention. I have a new computer so I have not got some of the programs on this one that I need to adjust my photos etc.
See you soon.
Thanks for popping by:)
We arrived in Brisbane on the Tuesday afternoon and settled into our apartment which was only two blocks from the Convention Centre. On the Wednesday myself and three other ladies hired a car and went for a drive to the Tamborine Mountains for the whole day. We had a wonderful time and the rain forest was absolutely gorgeous. We visited the Cheese Factory and strolled through the street to check out all the little shops including the yummy Fudge shop. Mmm! Mmm!
It rained off and on that day and it was 9', the coldest May in 8 years.
We then went to watch the Australian Outback Spectacular which was a very entertaining evening and I found it quite emotional. I felt so proud to be an Australian. The meal was great too. We left there and arrived back at our apartment around 11pm.
The following day was the beginning of the Convention. We saw many WOW demonstrations and I took lots of photos to remember them all. Its hard coming home after this event as we are not allowed to show anyone the products we received and we are so pumped up to show our friends and customers. One of the things that touched my heart was how Stampin' Up! help so many people less fortunate than ourselves. They donate to many charities including Ronald McDonald house. They asked us if we would like to help the Ronald McDonald House in any way and if we did they had someone taking names. I put my name down as a volunteer and am waiting for the call to be able to give back to society. One of the incentive trips that SU! did with their American demonstrators was to visit a poor country town and offer to help by painting and doing odd jobs including entertaining the little children by letting them make cards. This touched my heart so much that I had tears all afternoon and into the evening. I think that was my Pearl for the whole convention. I do hope they put that video onto You Tube or something as I would love to show it to you and lets see if you don't shed a tear.
I came home and spent the next day putting photos onto USB's that various demonstrators had given me. I am chief photographer for the Stamp-a-Roos (Ngaire Andersons group). I love taking photos and it actually lessens the crowd at the show and tell sections. This year there were 700 demonstrators at Convention and it is growing every year. One would think that we would have been crowded with that many demonstrators but it all seemed to flow very well. The Brisbane Convention Centre is very well layed out and there is plenty of room for everyone without rushing in to find a seat. I find sitting anywhere is great as you get to meet new people. We actually met a lovely lady by the name of Cheryl who was attending Convention for the very first time. We all hit it off well and it turns out that this lady is from Brisbane and is moving to Perth later this year. She did not know anyone in Perth but now she has a group of friends so the move wont be so daunting for her.
 |
| All Roomies together (what a great bunch!) Sue Slater, Pat Carr, Jenny Chilton, Tracey Parsons, Josephine Joss & Vikki Poyner |
 |
| Here I am in the beautiful Tamborine Mountains Rainforest |
See you soon.
Thanks for popping by:)
Monday, May 6, 2013
STAMP CAMP AT AVALON

It has been a whole week since our Stamp Camp at Avalon with Pat Carr. We had a wonderful time but the weekend went by so quickly. We arrived on Friday afternoon and stayed two nights and packed up around 2pm to head back home. There were 17 ladies and one of them my mum who enjoyed herself with it being her first ever stamp camp. It was a very busy weekend and lots of interesting projects. Avalon Homestead is situated just out of Toodyay in Western Australia. It is so peaceful and the views are just gorgeous. There was mist in the valley on Sunday morning and the birds were chirping and it was just magic sitting outside having a nice cup of tea with Mum.

Delveen and Peter are the owners of Avalon Homestead and they made us truly welcome. There is nothing that they wouldn't do for us. They are always happy to help. Delveen came in with her camera to take a few shots of us busy making our projects. I managed to talk her into making a card with us when it was my turn to demo. I am not sure if Delveen has made any cards before but she did a great job. She seemed pleased with her efforts. Here you see her with the card she made.

I have almost finished my projects from the camp. I brought home 5 packs that I was unable to complete on the camp. I have one more card to make. Here is a pic of the projects we made. There were 21 projects to be completed. We had guest demos who showed us some techniques that most of us had not seen before. They were Andrea Buckland, Susan Joyce, Angela Ebert and myself. At the time of taking this photo I could not find my card that I did the demo on so I have substituted one I made earlier. The one I did at camp was a slider card like the one Delveen is holding in her hand. I really liked the projects we made over the weekend. There were no real simple ones. Each one took quite some time to finish and as I said before a lot of us took home incompleted projects to finish at home.

The card below is what I think Pat called Floating Flower Card. What a great idea. You could use your imagination to do anything to this card. For a boy you could do aeroplanes, cars etc. You could do tools for the men or even beer. LOL! Anything is possible.

This is what the card looks like when you open it up. What a lovely surprise the recipient will get when they open up this card.

Well last but not least here is the group of 17 ladies sitting out the front of Avalon Homestead. This area was where we would take our cuppa out and sit and relax and clear our minds. Its easy sitting and making cards all weekend but your head does need a little break even if you dont think it does.
Thanks to Delveen and Peter who made our stay feel like home.

Well its off to bed for me. I have been sitting up trying to decide what swap to do for SU! Convention which is only two weeks away. I cant believe how quick this year has flown by and how quick Convention has come up. I still have no idea of what I am going to do. Perhaps something will come to me in my sleep.
Bye for now and thanks for popping by:)
Friday, April 26, 2013
Autumn is in the Air
Hello everyone! Well summer has left us and we have had some lovely weather in these past few weeks. A little bit of rain, sunshine, cloud etc. Keeping everyone happy at some stage. Not so hot, thats what I like.
I wanted to share a card that I have made for my Godchild. Katie is turning 21 on Sunday and I wanted to make something extra special for her as she is such a sweet and loving young lady. I have had my eye on this one for quite some time and was originally made by Odette Kermode, a very talented lady.
I had the pleasure of having Carolyn King visit and show me how the card is made and here is my version. My daughter visited and saw the one I had made and said that it would look nice with Sunflowers so here it is.
 I love the colours as they are so vibrant. Unfortunately I wont be seeing Katie for her birthday as I will be on a Stamp Camp with Pat Carr. I am sure Katie will be delighted when she opens the envelope and this little beauty pops out.

 This card is one of the projects done at our last workshop. I found the idea on Pinterest. You can find some amazing things on Pinterest. This one is a combination of two cards I had seen. I love the Chalkboard effect. It is so quick and easy to do. I never knew how easy it was until I actually did it myself. All you need to do is using Versamark and White embossing Powder to your image on Basic Black Cardstock. Once you have heated and set the image then get either a tissue or cotton wool and dab it into the Whisper White inkpad and sponge it around over your image or wherever you want the chalk mark effect. I would practice on the backside first just to see how it works.

I wanted to share a card that I have made for my Godchild. Katie is turning 21 on Sunday and I wanted to make something extra special for her as she is such a sweet and loving young lady. I have had my eye on this one for quite some time and was originally made by Odette Kermode, a very talented lady.
I had the pleasure of having Carolyn King visit and show me how the card is made and here is my version. My daughter visited and saw the one I had made and said that it would look nice with Sunflowers so here it is.


Just a little closer to show you the detail.


I received the Pinwheel Die sometime ago and thought I had better put it to use. It is so quick and easy to just run the pattern off using your die and Big Shot. Unfortunately most of the ladies found putting them together a bit difficult. The trick is to bend your little wings prior to joining them all together. This makes it easier in the long run.

Last but not least is a favourite as I love using Crumb Cake, Whisper White and Basic Black together. This one I have actually made into a Double Slider Card for Pat Carr's camp with the card going long ways instead of across. I love the Floral Fusion Die. The flowers are so cute. For this card I have used the Silver Glitter Paper for the centre of the flowers using an office punch instead of using Rhinestones. I found it quite effective and it really glistens in the light. I have also used the HoneyComb Folder, Window Frames Die and the Finishing Touches Edgelits.
Well I am off to Pat's Camp this afternoon (Friday) and wont be home until Sunday. I am so looking forward to it. My mum is also coming along with me and I am looking forward to her spending some time away and doing something she really loves. Mum has never been on a Stamp Camp before and I just know she is going to really enjoy it. We are going to be spoilt as we are staying at Avalon Homestead near Toodyay. Its a lovely setting and our hosts are just lovely.
I had better go and get ready so I will be back with some projects that we will be making.
Bye for now and thanks for popping by :)
Monday, April 15, 2013
More Products?

Between 15 April and 30th May you can earn more products for sales of $400 when you host a party. You will receive an extra $60 in fact. How great is that? You may already have something in mind but with that extra $60 it sure is going to help you get more.
Also if you join Stampin' Up! between these dates you will also get an extra $60 to choose in your kit. You may have been tossing up which last product to choose while choosing your kit. Well now you can have that extra product/products.
Contact me for more information.
Happy Stampin'
Monday, March 18, 2013
Its Baby Time!
Hi there! Its been impossible to get to my blog in the past three weeks. Life has been so busy and there are just not enough hours in the day. I guess if there were more hours then I would be more tired. What I really need is to split myself in two. That would work.
Anyway I am here now and I thought you would like to see what I have made for my niece and her husband on the birth of their new little bundle of joy. I sat up till 2am on Sunday morning to try to get this finished but had to get up early to finish it off the next morning.
I bought the frame from Ikea for $14.95. Each background piece is 5.5 x 5.5cm. The actual pictures are 5 x 5cm. I have used various stamp sets and I am sure you will recognise that most of them are discontinued. There are others that I could have used but all too big. I hope they like it.

This card is actually a copy of Alisa Tilsner from Port Lincoln, South Australia. I found the idea in the Australian Cardmaking Stamping & Papercraft magazine in Vol 19, No 1.
Alisa has coloured her flowers in using SU! Rose Red. I love the technique Alisa has used.
What you need to do is stamp your image using Whisper White Craft Ink Pad and then using White Embossing powder to emboss the image. Using your Aqua Pen along with the Whisper White Ink, colour in the whole image trying not to go out of the lines. Once that has dried you then need to clean your Aqua Pen and I used Baja Breeze ink to colour my flowers starting off lighter and then darker highlighting the areas I wanted darker. I love the image all coloured in white too. Very delicate.
I have used Crumb Cake Cardstock and the stamp sets I have used are Bordering on Romance and Loving Thoughts.

The next card is the one I am using for Ngaire Anderson's Stamparoo swaps. The theme is the new mini catalogue. I have used Cherry Cobbler and Midnight Muse cardstock. Cherry Cobbler stamp Pad for the image. The DSP is called Parker's Patterns. The stamp set is Just Thinking. A very simple card and the girls will be pleased tonight as I have prepared everything so they only need to piece it together. We usually have quite a few swaps to make on the night so it can get quite late. I quite like the colours of this card and nice to have one that you can use as a masculine card.

I made the next one for our grandson whose birthday is next Tuesday. I found a card online that had 16 cupcakes in the pop up inside. I started to make this card but thought it was too difficult for my workshop on the weekend so I designed one that had only four. I have made the gift box pop up card before but I found this needed a little more effort. Because I used three different coloured glitters and due to the pop up section I decided to prep this one a bit more. The girls only had to make the cupcake on the front. I thought too much different coloured glitter would be too much floating around. One of my girls does not like working with glitter and lucky this time she was unable to attend due to a course she was on. I have used Window Frame Framelits for this card. The Create a Cupcake Stamp set and the punch to go with it. On my original card I used Crystal Effects on the cherry but omitted it from this card. Might do it later. My daughter always wanted a pop up book when she was little so she will appreciate this card for her son.


The last card is one that I made for our niece's baby. I found this one online Creations by AR here. Adela has made up a tutorial where you can buy it for $5.00. Her card is a very tiny one which measures 11x9cms closed. I enlarged my pattern to 16.5x14cms. Where Adela's card will fit onto an A4 size cardstock all in one piece, mine does not. I made the join at the bottom and just extended the button up part to the back which form the part that does not open. The card opens at the top. All you need to do is life the collar out from the Brad and walla! there you have it. The tiny ones that Adela made are just gorgeous. Adela also does a little Gift box pattern which is included with your purchase. There is also a gorgeous baby girl card with tulle. There are different designs of jumpsuits as well. Go ahead check her site out. You may find something else you like.
Well thats about it for now. Remember Sale-A-Bration ends this Friday 22nd March so if you need anything and you spend over $100 you will be entitled to a free gift. Thanks for popping by:)
Anyway I am here now and I thought you would like to see what I have made for my niece and her husband on the birth of their new little bundle of joy. I sat up till 2am on Sunday morning to try to get this finished but had to get up early to finish it off the next morning.
I bought the frame from Ikea for $14.95. Each background piece is 5.5 x 5.5cm. The actual pictures are 5 x 5cm. I have used various stamp sets and I am sure you will recognise that most of them are discontinued. There are others that I could have used but all too big. I hope they like it.

This card is actually a copy of Alisa Tilsner from Port Lincoln, South Australia. I found the idea in the Australian Cardmaking Stamping & Papercraft magazine in Vol 19, No 1.
Alisa has coloured her flowers in using SU! Rose Red. I love the technique Alisa has used.
What you need to do is stamp your image using Whisper White Craft Ink Pad and then using White Embossing powder to emboss the image. Using your Aqua Pen along with the Whisper White Ink, colour in the whole image trying not to go out of the lines. Once that has dried you then need to clean your Aqua Pen and I used Baja Breeze ink to colour my flowers starting off lighter and then darker highlighting the areas I wanted darker. I love the image all coloured in white too. Very delicate.
I have used Crumb Cake Cardstock and the stamp sets I have used are Bordering on Romance and Loving Thoughts.

The next card is the one I am using for Ngaire Anderson's Stamparoo swaps. The theme is the new mini catalogue. I have used Cherry Cobbler and Midnight Muse cardstock. Cherry Cobbler stamp Pad for the image. The DSP is called Parker's Patterns. The stamp set is Just Thinking. A very simple card and the girls will be pleased tonight as I have prepared everything so they only need to piece it together. We usually have quite a few swaps to make on the night so it can get quite late. I quite like the colours of this card and nice to have one that you can use as a masculine card.

I made the next one for our grandson whose birthday is next Tuesday. I found a card online that had 16 cupcakes in the pop up inside. I started to make this card but thought it was too difficult for my workshop on the weekend so I designed one that had only four. I have made the gift box pop up card before but I found this needed a little more effort. Because I used three different coloured glitters and due to the pop up section I decided to prep this one a bit more. The girls only had to make the cupcake on the front. I thought too much different coloured glitter would be too much floating around. One of my girls does not like working with glitter and lucky this time she was unable to attend due to a course she was on. I have used Window Frame Framelits for this card. The Create a Cupcake Stamp set and the punch to go with it. On my original card I used Crystal Effects on the cherry but omitted it from this card. Might do it later. My daughter always wanted a pop up book when she was little so she will appreciate this card for her son.


The last card is one that I made for our niece's baby. I found this one online Creations by AR here. Adela has made up a tutorial where you can buy it for $5.00. Her card is a very tiny one which measures 11x9cms closed. I enlarged my pattern to 16.5x14cms. Where Adela's card will fit onto an A4 size cardstock all in one piece, mine does not. I made the join at the bottom and just extended the button up part to the back which form the part that does not open. The card opens at the top. All you need to do is life the collar out from the Brad and walla! there you have it. The tiny ones that Adela made are just gorgeous. Adela also does a little Gift box pattern which is included with your purchase. There is also a gorgeous baby girl card with tulle. There are different designs of jumpsuits as well. Go ahead check her site out. You may find something else you like.
 |
| Baby jumpsuit card closed. |
 |
| Baby jumpsuit card open.
|
Saturday, February 23, 2013
25 YEARS! ITS A PARTY!

Yes thats right. Stampin' Up! are in their 25th year and boy is it a time for celebration. We have our new Seasonal Catalogue out at present which runs from Feb 1st to June 30th 2013. It has lots of ideas and as usual lots of great new products. There are too many to mention as there are 39 pages for you to browse through. Click on the icon on the right of the screen to see what products are available. Remember once June 30th arrives you may not see these items again. Occasionally one of your favourites end up in the new Annual Catalogue but we never know which prouducts. So get in quick to secure your order.

We also have our annual Sale-A-Bration catalogue which has been running from 22 January to 22 March 2013. There is not much time left so go the the bar on the side if you wish to see what little goodies you can receive for free. All you need to do is spend $100 and you get one free product or if you like you can spend more and more free goodies. For every $100 you spend you will receive 1 free product from the Sale-A-Bration catalogue. Below you will see what products are available.

Well have a browse of the catalogues and I will be back with some more projects I have made. It has been a busy start to 2013 but hopefully I am on track now.
Thanks for popping by :)
Monday, January 7, 2013
Christmas Ideas
Here I am once again after realising that I need to use Mozilla to be able to bring my photos through to my blog.
Gosh its been a warm day today. First of all it was raining and then I heard it was 90' humidity. I wondered why my feet were kind of sticking to the floor.
 Here is a Christmas Cracker which I cased from Andrea Walford. This was also my Secret Santa gift when the Stamparoo's met for a Christmas gathering at San Churro's in Hillarys Boat Harbour. I have used a toilet roll for the inside but if I were to put something in it I would have used a kitchen roll of some type. I have decided to use this one as one of the decorations on my tree so have left it empty. You need some red tissue paper, some DSP and ribbon. I have looked online to see if the tutorial is still available but I cannot find it. To view it you will need to be a member of her Paper Crafters library. I cannot seem to find any tutorials anywhere for this cracker so I will give you a quick run through of how the tissue paper part is done.
For the ruffles on the end you will need to pull out one sheet of tissue paper. Fold it in half so that you can find the centre. Unfold it and then fold one side of the long side toward the middle to the midline. Do the same to the other side. Then fold in again to the midline on both sides. Do this one more time until your tissue paper is about 3" wide. You will then need glue down one side to keep them together while cutting little strips about 2/3 way, careful not to cut to far. This forms the ruffle. You will need to do this twice as you will need one for each end. Its quite a tedious job but if you have one of those scissors with the three or four blades on it you will be finished in no time.
 These cards were also cased from Sue Madex Creations. The original card featured the Snow Flurry on the front with the Silver Glimmer Paper. I decided that you could only get 9 flurries from 1 sheet so I used the Ornament Keepsake Dies instead. I have Stamped the Snowflake Soiree (holiday catalogue) image onto the Whisper White and embossed with White Embossing Powder. I then used the Emboss Resist technique and went over with a dauber with Bashful Blue, Marina Mist and Not Quite Navy ink. The card is folded in half and then the front part is folded in half backwards toward the spine of the card. Be sure when writing your message it is not visible when the front of the card is closed. The Whisper White card that you can see has been embossed with Northern Flurry Folder. The Ornament Keepsake baubles are one with Silver Embossing Powder and the other with White Embossing Powder. I decided I liked the White better. I have kept the card very simple with no sentiments as I feel it does not need anything else. Check out Sue Madex website to check out her lovely card. She also gives the dimensions for the Z Fold.

 For Christmas I decided to make some biscuits to give to my fellow colleagues at work. All in all I made around 130 biscuits. My daughter had found the recipe and I thought it was a great idea as they were Christmas Wreaths glazed with lemon icing and dotted with red and green decorations. I have since made another two batches with the last one being tonight. My mum found the cookie maker at a market and paid only $2.00 for it years ago. She has never used it but gave it to my daughter and I borrowed it for my biscuits.
I first made one of these boxes at Pat Carr's Cancer Council fund raising day. Pat had actually used Be Of Good Cheer DSP. I have used Candlelight Christmas Specialty DSP. You will need to purchase a pack of Kraft Gift Boxes from the main Catalogue, only $4.95 for a pack of 4. I have used Very Vanilla Cardstock to cover the sides and top and embossed them with Vintage Wallpaper Embossing Folder. I used Teeny Tiny Sentiments for the Merry Christmas and Itty Bitty Banner Die to cut them out. I could only fit 8 biscuits into the boxes but that was enough for a tasty little treat.
Well I am off to bed now as its been a long hot day for me. I am worn out trying to catch up on my chores and errands.
Thanks for popping by :)
Gosh its been a warm day today. First of all it was raining and then I heard it was 90' humidity. I wondered why my feet were kind of sticking to the floor.

For the ruffles on the end you will need to pull out one sheet of tissue paper. Fold it in half so that you can find the centre. Unfold it and then fold one side of the long side toward the middle to the midline. Do the same to the other side. Then fold in again to the midline on both sides. Do this one more time until your tissue paper is about 3" wide. You will then need glue down one side to keep them together while cutting little strips about 2/3 way, careful not to cut to far. This forms the ruffle. You will need to do this twice as you will need one for each end. Its quite a tedious job but if you have one of those scissors with the three or four blades on it you will be finished in no time.


 For Christmas I decided to make some biscuits to give to my fellow colleagues at work. All in all I made around 130 biscuits. My daughter had found the recipe and I thought it was a great idea as they were Christmas Wreaths glazed with lemon icing and dotted with red and green decorations. I have since made another two batches with the last one being tonight. My mum found the cookie maker at a market and paid only $2.00 for it years ago. She has never used it but gave it to my daughter and I borrowed it for my biscuits.
 I first made one of these boxes at Pat Carr's Cancer Council fund raising day. Pat had actually used Be Of Good Cheer DSP. I have used Candlelight Christmas Specialty DSP. You will need to purchase a pack of Kraft Gift Boxes from the main Catalogue, only $4.95 for a pack of 4. I have used Very Vanilla Cardstock to cover the sides and top and embossed them with Vintage Wallpaper Embossing Folder. I used Teeny Tiny Sentiments for the Merry Christmas and Itty Bitty Banner Die to cut them out. I could only fit 8 biscuits into the boxes but that was enough for a tasty little treat.
Well I am off to bed now as its been a long hot day for me. I am worn out trying to catch up on my chores and errands.
Thanks for popping by :)
HAPPY NEW YEAR!!!

Happy New Year to you all.
I have been missing in action as you can tell. Christmas is such a busy time and it has been very hot here and I just have not had it in me to sit in a hot room to do my blog.Its raining today HOORAY! You know I love the rain. It is still quite muggy though but I have my window open and can hear the pitter patter of the rain and can feel a slight breeze. Love it!
I have just tried to download some pictures from my computer but for some unknown reason I am unable to do so. The blog thingy just wont let me. I know one of my other SU! buddies was having a problem recently but didnt think it had done the same to mine. As you can see I can copy and paste from the website but just not able to download my cards I have made. Oh well! I have just found out the reason for not being able to add pictures. I have to use Mozilla! I will be back later with my pics!
As you know a new year has begun and there are lots of exciting things happening this year as Stampin' Up! celebrate 25 years. I am sure we will be in for some surprises.
The Holiday catalogue ends at the end of this month so be sure to check it out here and let me know if there is anything you need and I will be sure to get it to you. You must let me know before the end of January 2013.
On February 1st 2013 we have the launch of our special 25 year celebration catalogue. I cant show you as yet but be sure to keep watching this spot as there are some fantastic products in it.
Sale-a-bration will begin on 22 January 2013. This is when for every $100 you spend on anything in the catalogues you will receive a product of your choice free from the Sale-a-bration catalogue. There is a wide choice this year so be sure to check that out when the time comes. I will post the links on my blog when the time comes.
My Little Valentine Promotion

Stampin’ Up!’s got a super special valentine offer sure to set your heart
aflutter!
Get the Sealed with Love Simply Sent Kit FREE—a $15.95
value—when you buy the brand-new My Little Valentine Stamp Set!
| Item | Description | Price |
| 132242 | My Little Valentine (clear-mount) | $17.95 |
14 December, 2012–21 January
We’re temporarily taking over a hundred products out of retirement with discounts up to 70 percent off retail–only while supplies last! We’ll have four different groups of products on sale during the next month.
Talking Tag

With Talking Tag, you can send a gift that is uniquely you.
Talking Tag is a message label you can attach to cards, invitations, gifts . . . anything!
Personalise birthday cards, Christmas gifts or even record quick instructions for a recipe.
Now your pictures really can say a thousand words!
How to send a voice message:
How to send a voice message:
- Download the FREE TalkingTag™ App on you smartphone from talkingtag.mobi, iTunes® or Google Play™.
- Adhere the message tag to your card or gift.
- Open TalkingTag™ App and scan the code.
- Record your message (recording starts immediately, so make sure you’re ready!).
You will have the opportunity to listen, re-record, cancel, or confirm your message after you’ve
completed recording it. Each label allows up to 60 seconds of a greeting, song, or product message.
To play the message, recipients will need to download the app and scan the code. Messages are saved for two years, so they can listen to it over and over.
Buy them by the sheet! You get 10 tags for just $12.95 AU/$15.75 NZ (item 129723).
Check out the You Tube site on how to use the Talking Tag and you will see just how easy it is to use.
Well I guess thats about it for now until I can find out why I cant add my photos to my blog.
I do hope that 2013 is a very special one for you. I know my neice is really looking forward to having their first child this year.
Bye for now until next time. Thanks for popping by :)
Subscribe to:
Posts (Atom)