 |
| This is a cute little 3"x3" card made of Vellum |
Yes I think I need to catch up as I have not posted for over a month now. I can't believe where the time goes. I keep thinking I must get on and do something but time just slips away. I must admit I have not been on my computer very often of late. With winter here (although hardly any rain), we have had some very cold evenings and my craft room is quite cold. I do have a heater that I sometimes put on. The main heater is in the family room. Our cat Mia has a catdoor which opens out to the side garden into her cat cage and the air from outside continually comes in. We cannot leave the family room door open as the heat escapes out the side door. Oh well! The joys of having pets. Most of the time my cat spends her time in my bed. I have to put a towel over my pillow which then goes under the sheets so that she can lay on it. She always lifts up the doona to lay underneath. Lucky cat! We have a lovely warm waterbed so why wouldn't she?
Anyway I am here now and have quite a few cards to put up so I hope you enjoy browsing.
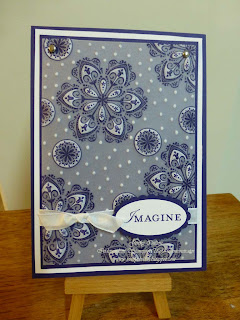 |
| Cased from Heather Tiley |
I dont know where to start so I will start with one of my favourites from the SU! Conventions Swaps. I just love this card which was made by obviously a very talented lady by the name of Heather Tiley who was inspired by Dawn Olchefske. I cased this card and used it for two of my workshops. The ladies loved this one.
This card was made using the following:-
Cardstock - Vellum Card, Whisper White, Crushed Concord (one of my favourites and sadly leaving us at the end of August)
Stamp Sets - Mixed Bunch, Loving Thoughts (both from Autumn Winter Mini)
Ink Pads - Concord Crush
Accessories - Whisper White Ribbon, Scallop Oval Punch, Oval Punch, Brads, Stylus from the Simply Scored Scoring Tool (to rub on the underside of the stamped vellum to raise up the pattern which makes it go a white colour)
Don't you just love it? You just have to make this card as it looks better in real life.
I have also made a few extra cards using the same technique but using Real Red Cardstock and Inks.
In these cards I have used Snow Swirled and Tree Trimmings Stamp Sets.
 |
| Real Red CS, Vellum & Snow Swirled Stamp Set |
 |
| Using Real Red and Tree Trimmings Stamp Set |
I guess its Christmas in July now so not so early for Christmas Cards. At least getting a head start for December!

The next few are using Glossy Cardstock. I was asked by my group of ladies for different ideas on how to use the Glossy CS. Here are just a few ideas.
The first one is one of my favourite techniques. First of all you need to cut out your piece of cardstock (Glossy) and go over it with your Brayer using More Mustard. Using your Sanding Block rub in one direction back and forth over the cardstock. Once you have gone from one end to the other then turn around clockwise once and start sanding the opposite way from one side to the other.
You then stamp with Music Notes Wheel with Basic Black. I have also added some Real Rust Ink (discontinued) using the Extreme Elements Stamp Set. Go over the image once again with the Sanding Block until you have a feint image before you. I have cut out a circle with Basic Black CS for the record using the Circles #2Dies and the image from Grunge Rock as well as the guitar. I have used the Dotted Scallop Ribbon Border Punch for around the image and placed it on some DSP and Real Rust CS then Basic Black CS. I quite enjoyed making this card. I hope you like it.

The next one is using up your scrap pieces of Glossy Cardstock embossing
with the Petals A Plenty Embossing Folder. I have used Tempting
Turquoise and Tangerine Tango Cardstock and Ink. Using a sponge gently
go over the embossed area which highlights the pattern. The punch I used is actually discontinued but I had forgotten at the time. Sorry!
A very simple card but quite effective.
The next card I used Lovely As A Tree and I also cased this one. I am so sorry as once again I cannot find the name of the talented person who I cased it from. First of all cut your piece of Glossy Cardstock to the size you wish. Run over with your Brayer using Daffodil Delight. You will need to tear a piece of paper a lay it about 1/4 of the way up from the bottom and using your brayer this time with Pumpkin Pie Ink go over the cardstock for the remaining 3/4 of the card. Lift up your piece of paper and move it to about halfway and go over again with your brayer but this time using Soft Suede Ink. For the last time lift up your piece of paper and move it again to approx 1/4 of the way from the top and go over with brayer using Bravo Burgandy. You can then use Versamark and Black Embossing Powder to place your Lovely As A Tree image onto your card. I have torn the sides of the card for a bit more texture.

I have made two cards the same here using the same technique but one is with Confetti Cream cardstock and the other with Glossy Cardstock. I have used Versamark on each cardstock and embossing with clear embossing powder using Mixed Bunch Stamp Set (leaving us at the end of August, hopefully to join us in the new Catalogue - only hoping) When using the heat gun on this technique you need to heat it enough to make the raised layer disappear. It takes a lot longer on the Glossy Cardstock but not so long using the Confetti Cream. You need your image to look like it has an oil effect and you could possibly see the image on the other side of the cardstock. Using your daubers choosing your colours go over the images. I have used Concord Crush, Pumpkin Pie and Tempting Turquoise. It gives your card a Batik look.

I was asked to make a card for my boss as it is their 25th Anniversary of their business. I thought and thought of what to do. I could not make it too fussy as it was for a man and a woman. I finally came up with the balloon idea and the sentiment The Sky's The Limit and this is what I came up with. I saw Tara Bilbao's card using the same stamp set and drew my idea from that. Thanks Tara! The card is actually an A5 size and inside I used whisper white and sponged the clouds all over. I placed an extra piece of cardstock so that there was enough room for all of the staff's good wishes. They loved it!

I was also asked to make a card for one of our staff for his 60th birthday and this was what I came up with. I saw the tag idea in the Summer Mini Catalogue using the gorgeous Open Sea stamp set. I hope this one makes it to the new Catalogue in September too. I also used the DSP Nautical Expedition from the Summer Mini Catalogue. This card is an A4 size as there were to be quite a few people coming along to sign the card.

I have been having a look on Pinterest. Check it out as there are lots of ideas on there and not just cards and crafts. There are all sorts of categories such as Cooking, Renovations, Clothing etc. This is where I found my next card. Yes I have cased this one too but using a different colour and stamp set. The designer of this card is the very talented Paula Dobson. Her card is gorgeous, obviously the reason why I love it so much. We used this card for my last workshop. A very simple but effective card. Check out Paula's
blog for her card. I actually used Crumb Cake for my workshop but had mine on show for a different colour.
The last few cards are using the Framelits Labels Collection from the Autumn Winter Mini Catalogue. I found these ideas on you tube. The first one (Flip Flop Card) was found
here and the second one (Framelit Funfold Card) was found on this
site.
Its great that we can look up the tutorials on You Tube and watch them step by step and pause when you want to. I tend to watch the video first writing down the measurements then watching again and pausing as I go to make the card. The Pumpkin Pie card below is a very simple one and can be made quickly for that birthday you almost forgot for that someone special.


Well I guess I had better get off to bed. Its almost midnight and I start work at 7.30am tomorrow. It is to be 2 degrees tonight so it will be nice to snuggle up in our lovely warm waterbed.
I hope you have enjoyed this post. I know its a long one but I had to catch up. I will try to promise to post at least once a week from now on. I am going to have to designate a night when I actually post.
Dont forget the Autumn Winter Mini is almost finished. You have until 31st July to put your orders in. Remember we cannot guarantee that any of the products in the mini will appear in the new Catalogue in September.
So from me its bye for now and thanks for popping by:)


